Speaker
Description
source_pdf: RHTG_Buquet_et_al_2022[1].pdf
conversion_note: Two-column PDF linearised to Markdown.
1. INTRODUCTION
One of the side effects of using drag to slow-down spacecraft during their entry into an atmosphere is the resulting substantial heating to the vehicle. The resulting heat flux, which can lead to failure of the structure, is strongly influenced by a change in gas composition due to the sudden and steep temperature gradient through the shock near the surface [Jr.19]. These strong thermochemical reactions take place within the shock layer, in which the imbalance in gas species initially results in a state of nonequilibrium where the internal degrees of freedom of the gas are excited, heavily influencing radiation. For missions such as Mars return, during which entry velocities can be as high as 15 km/s, radiative heating becomes the primary source of heat load on the vehicle’s surface [BJ14]. As this process involves complex models and is computationally expensive, laboratory ground testing can reduce uncertainty by providing validation data. Shock tube experiments are a tool to recreate these thermochemical phenomena in a ground-based facility.
Emission spectroscopy can be used to investigate a slug of gas thermochemically similar to the gas encountered by the vehicle during re-entry in order to measure radiative emission and spatially resolve temperature and gas species densities. Knowledge of these quantities offers a better understanding of the flowfield around the vehicle, and a better prediction of the contribution from radiative heat transfer, currently predicted with an uncertainty of the order of 80% [JMG+13]. This uncertainty leads to excessive safety margins in the design of thermal protection systems, which amount to a substantial portion of the vehicles’ mass. It is therefore crucial to be able to quantify it.
As velocity increases, vacuum ultraviolet (VUV) radiation presents an increasing contribution to the total radiance [HLZ+16]. This radiative heat flux arises from high-energy electronic transitions of atomic nitrogen and oxygen, characterised by short wavelengths and strong intensity radiation. By comparing the relative line intensities of their multiplets, the ground state densities can be determined, which makes VUV spectral data particularly useful to characterise the flow. As density is especially low during high-altitude flight, or in atmospheres as thin as Mars’, equilibrium states take more time to be reached. The non-equilibrium component of the shock layer, where dissociation, ionisation and excitation are not in equilibrium with their backwards reactions,can account for a large proportion of the emitted radiation [BJC16]. Although critical, the quantity of existing spectra dataset in the VUV region is limited due to its challenging acquisition.
This paper first describes the experimental arrangement and working principle of the VUV spectroscopy system under development in the Oxford Hypersonics laboratory, followed by a detailed description of the optical system design and of its analysis through ray-tracing simulation in Section 3. Section 4 explains the calibration and characterisation of the system, and Section 5 defines the test conditions selected through shock tube and nonequilibrium radiative transport and spectra simulations using the simulation tools Poshax3 and NEQAIR for future test campaign.
2. Experimental arrangement
2.1. Facility
The T6 Stalker Tunnel shock tube was previously used to perform emission spectroscopy in the wavelength regime of 300-850 nm to measure radiation in the shock layer [CDM19a, GCM21, GCJ+]. A VUV emission spectroscopic system is currently under development to use on T6 in its shock tube mode, with the goal to perform spectroscopy for shots in the velocity range of 10-15 km/s. The T6 Stalker Tunnel is a high enthalpy ground testing facility, able to perform as a reflected shock tunnel, an expansion tube, or a shock tube of different diameters. Its latter mode is of interest in this paper, but details of the facility’s development were reported in various publications [CDS+21, SCG+]. A schematic of the tunnel in its different configurations is shown in Fig.1.
https://indico.esa.int/event/594/contributions/12463/attachments/7652/14770/figure_194_01.png

Figure 1. T6 Stalker Tunnel schematic [CDM+19b].
The driver section contains a piston separating high pressure reservoir gas and lower-pressure, low molecular weight compression tube gas. The piston is accelerated by the reservoir gas and quickly compresses the driver gas to high pressure and temperature against a metal diaphragm separating the driver and the shock tube. When the diaphragm ruptures, the driver gas is free to expand into the low-pressure test gas, driving a shock wave, while still compressed by the piston to maintain pressure in the driver section and avoid expansion waves to travel downstream and interact with the shock. The slug of gas following the shock undergoes the same non-equilibrium thermochemical processes as the stagnation streamline in front of a (re-)entering vehicle, allowing investigation of
emitted radiation of interest.
2.2. Working Principle of the VUV spectroscopic system
Because molecular oxygen and water vapour absorb VUV wavelengths in ambient air, any acquisition set-up must operate either using oxygen-free gas or under a high level of vacuum, the latter being the approach of the current work. The collection optics system is designed to be contained in vacuum chambers fitted to the shock-tube via the test section window. The different parts of the set-up can be seen in the schematic in Fig.2 and in the CAD model in Fig.3. This system consists of one circular and one square vacuum chamber attached to a VUV Spectrograph (McPherson 207V). An intensified P43 iStar sCMOS camera is connected to the spectrograph to record the spectra. The red window holder is attached to the barrel and allows connection of the VUV system via the green interface fitter plate. The mounting of the chambers is separated into a static yellow system which is fixed to the laboratory floor, and blue and purple dynamic systems respectively moving in the lateral and axial directions with respect to the main T6 barrel, as shown in Fig.2. The whole system is pumped down to a low vacuum level (10$^{-3}$ Pa range) up to the test section’s window using a dry scroll pump (Edwards nXDS10i) and a turbo pump (Edwards nEXT300D) mounted in series.

Figure 2. Schematic of the VUV system’s different parts and of its dynamic features. From top to bottom: VUV system inserted in the shock tube, bellows and purple system adjusting for tunnel recoil during a shot, VUV system extracted from the tunnel. Not to scale.

Figure 3. CAD model of the VUV system, inserted (top) and extracted (bottom). Purple parts allow for axial movement during tunnel recoil, blue parts for lateral movement while yellows parts are fixed
Before being secured to the tunnel, the VUV system can be positioned next to the test section and the length of the legs adjusted for correct alignment of the window with the shock tube’s axis. As can be seen in Fig.4, the window insert tightly fits in the red window holder previously bolted to the tunnel. A set of four rod guides helps to ensure alignment. Once in position, the green interface fitter plate and the red window holder can be bolted together. At this point, the entire VUV system up to the window can be pumped down. A gauge positioned on the cylindrical chamber allows to keep track of the level of vacuum. When a satisfactory threshold is achieved, the VUV system is ready for a shot. The set of bellows connecting the VUV system to the test section as well as the purple system allow the system to accommodate the tunnel’s recoil movement.
When T6 is back at atmospheric pressure after a shot, the VUV system can be detached by unbolting the interface fitter plate from the window holder. The VUV system is then pulled backward across the rails using the handles, to the maximum length of 200mm allowed by the bellows joining the vacuum chambers. The cylindrical chamber’s movement along the rails is limited by hard stops in both directions, ensuring precise realignment and repeatability for the next shot. On the other end of the bellows, the optics table supporting the spectrometer and the square vacuum chamber remains static. When the tunnel is free of the VUV system, it can be pulled upstream to proceed with the tunnel turn-around procedure.

Figure 4. Mechanical attachment of the VUV system to the tunnel for a shot, and detachment for turn-around and calibration
2.4. Calibration
Once the tunnel is pushed upstream for turn-around, the VUV system can be pushed back to its nominal position, 200mm closer to the tunnel’s axis. The calibration box shown in Fig.6 and the deuterium lamp can then be fitted to the interface window holder as shown in Fig.5, and the extra volume contained in the calibration box between the light source and the window pumped down using the pipework shown in schematic in Fig.7. Calibration of a single point can be performed during tunnel turn-around, in conditions as similar as possible to the shot’s ones.

Figure 5. Deuterium lamp and calibration box mounted on the window to perform calibration during tunnel turnaround
Prior to the test campaign, a range of spatial calibrations can be performed independently of T6 to use as comparison for the daily single point calibrations taken during the test campaign, between the tunnel’s shots. In this scenario, the sliding plate in Fig.6 on which the deuterium lamp is mounted can take different positions along the window. This allows to obtain calibrations for a range of axial locations, modelling the shock moving along the tube. By shortening the length of the tables legs, the system can be put on wheels and moved within the laboratory with minimal disassembly.

Figure 6. Calibration box details (exploded view). The sliding plate with the deuterium lamp can be moved along the tunnel’s axis to generate a set of calibration points along the window.

Figure 7. Pipework schematic to pump down the VUV system and the calibration box
3. Optical design
The optical system presented in this work consists of a set of five mirrors, redirecting the light from the centerline of the shock tube to a high spectral resolution spectrograph on which an intensified sCMOS camera is mounted. Windows have to be made of magnesium fluoride (MgF2) and mirrors of VUV-Enhanced Aluminium and MgF2 to allow transmission and reflection of VUV light. To reduce spatial blur and obtain the highest fidelity and intensity of signal, the collection optics set-up was designed in a telecentric configuration [GCGY09]. Telescopic systems suffer from larger spatial blur due to ray divergence.
3.1. Mirrors Characteristics for Telecentric System
The mirrors were designed using an optimisation approach, and comprise two plane mirrors forming a periscope system, two powered mirrors respectively collimating and focusing the light onto the spectrometer slit, and a cylindrical mirror between the latter two to correct for astigmatism. The numbers they were assigned and fill be referred by in the following section can be found in Table 1.
Table 1. Mirrors denominations and characteristics
| N$^{\circ}$ | Name | Shape |
|---|---|---|
| 1 | High periscope | Rectangular plane |
| 2 | Low periscope | Rectangular plane |
| 3 | Collimating | Spherical plano-concave |
| 4 | Cylindrical | Cylindrical plano-concave |
| 5 | Focusing | Spherical plano-concave |
In a telecentric system, light is collimated by placing a powered mirror at a distance equal to its focal length from the region to be imaged, i.e the centerline of the shock-tube in this case. The rays leaving the mirror focus towards infinity, creating chief rays parallel to the optical axis. Maintaining lines of sight perpendicular to the shock can greatly reduce spatial blur [GCGY09], which is particularly important for study of the non-equilibrium region where the gradients in emission characteristics are very strong with distance from the shock. The second powered mirror focuses the light onto the spectrometer slit. To ensure telecentric imaging characteristics, it has to be located a distance equal to the sum of the powered mirrors focal lengths away from the collimating mirror. As its virtual object is located at infinity due to the collimation of the incoming rays, this also means that the mirror must be located one focal length away from the spectrometer’s slit. The geometry of the system is shown in Fig.8.

Figure 8. Geometry of telecentric system. Numbers correspond to numbering shown in Table 1.
These optical constraints, coupled with the geometrical constraints from the pre-existing vacuum chambers shown in Fig.9 were used in an optimisation procedure to obtain the mirrors’ positions, angles, focal lengths and diameters for optimum spatial imaging of the test section. This code also enforces that all optics have the same f-number (F#) as the spectrometer to avoid under-filling or risking stray light interferences, and sets limits to the magnification of the system, which is defined by the ratio of the two powered mirrors’ focal lengths following $Msystem = \frac{f_{collimating}}{ f_{focusing}}$ . In summary, focal lengths of the powered mirrors are constrained by their distance from each other, their respective distances from the centerline of the tunnel and from the spectrometer slit, as well as the magnification of the system.
Finally, as the collimated light has to travel through a set of bellows parallel to the shock tube between the two vacuum chambers, the light exiting the collimated mirror has to be perfectly parallel to the tunnel’s axis. This puts an additional constraint on the position of the periscope mirrors, which are used at an unconventional angle shown in Fig.9. The angle necessary to redirect the light coming from the test section to the collimating mirror generates an extra component to the light path, such that the second periscope mirror has to be shifted further towards the collimating mirror in order to collect as much light as possible from the first periscope mirror, from which it is tilted at an angle lower than the common 45$^{\circ}$.

Figure 9. Geometry of telecentric system. Numbers correspond to numbering shown in Table 1.
3.2. Ray-tracing simulations
Ray tracing simulations were performed to observe, quantify and correct optical aberrations using the Optometrika MATLAB library [Yur02]. This allowed to confirm collimation of the rays with the current mirrors’ configuration, expected magnification from Gaussian optics as well as expected field of view. Simulations were carried out by collecting the light at the spectrometer slit by modelling a virtual object of equal dimensions and pixel resolution as the camera’s sensor, and sending light from different point sources located at the centerline of the tunnel. Samples of the simulations are shown in Fig.10, for the case of three 3mm diameter light sources each made of 20,000 rays.
An aperture the size of the window is placed at a distance equal to the tunnel’s radius from the light source. The mirrors were located and angled using the information obtained from the optimisation code, and modelled using the refractive indices of MgF2. Various apertures were added to model the bellows and vacuum chambers’ flanges and confirm no light was cut. Light sources of wavelength 150 nm propagating in vacuum were sent from different points along the window’s length.

Figure 10. Ray-tracing simulation using Optometrika. The chiefs rays travelling to and from the periscope mirrors are angled, while they remain parallel to the optical axis when leaving the collimating mirror (bottom right).
Ray-tracing simulations allowed observation of astigmatism and loss of intensity along the light path. The fourth mirror, initially flat with sole purpose to redirect the light from the collimating to the focusing mirror, was replaced by a cylindrical mirror to correct the astigmatism shown on the top half of Fig.11. Before correction, the circular light source gets strongly uni-directionally deformed along the light path, and intensity is so spread out that any signal is hardly recovered by the time it reaches the spectrometer slit. Figure 12 shows that the astigmatism is already present when the light reaches the collimating mirror, where the ideal circle of light is turned into an ellipse. This type of optical aberration is uni-directional because rays lying in perpendicular planes on the optical axis focus at different distances. Astigmatism could be introduced by the large angles of the periscope mirrors generating light paths of different lengths for rays emanating from the same source, which can be seen by the deformation of the signal received by the periscope mirrors on Fig.12. By using a cylindrical mirror, convergence of the rays in the dimension suffering from astigmatism is introduced and an axisymmetric signal of satisfying intensity is recovered. This same strategy was used for the VUV spectroscopy set-up in EAST [GCGY09]. Figure 12 shows the effect of the cylindrical mirror on recovering a circle at the spectrometer slit.

Figure 11. Simulation of the signal collected at the spectrometer slit from 5 light sources before (top) and after (bottom) the use of a cylindrical mirror. For the noncorrected image, the signal is shown with increased contrast and saturation to compensate the loss of intensity.

Figure 12. Projected light on every mirror in the light path, generated by a diverging light source of 1mm diameter located at the tunnel axis. Using the cylindrical mirror, a circle is recovered at the spectrometer slit where the object is imaged. Light is travelling from bottom to top.
A compromise had to be made on the ideal magnification of the system, defined by the ratio of the maximum length along the test section collected by the mirror and the size of the camera’s sensor. Ideal magnification led to a small focal length of the focusing mirror, which directly impacts its distance from the spectrometer slit and therefore from the cylindrical mirror. With such a small distance between the two mirrors, the large turning angle of the rays led to large astigmatism. By pushing the focusing mirror further away to limit the angle of incidence of the rays to 30$^{\circ}$, linearly increasing the focusing mirror’s focal length, simulations showed better signal intensity and a lower curvature of the cylindrical mirror necessary to compensate for aberrations. This however led to a change in magnification of the system from Mideal = 10:4967 to Mpractical = 7:1777, which corresponds to a field of view along the test section’s window of approximately 100.5 mm. The field of view calculated through Gaussian optics was confirmed by simulations, as shown in Fig.13.

Figure 13. Field of view measured from simulation is 99.7 mm, which is close to the theoretical 100.5mm obtained from Gaussian optics. The 6.5$\times$6.3 $\mu$m pixel size shown corresponds to the sensor. The resolution will however be limited by the intensifier, which has a coarser pixel size of 25 $\mu$m.
4. CALIBRATION OF THE SYSTEM
To obtain correct absolute radiation values, the system must be calibrated in three dimensions, $\lambda$ (wavelength), y (space) and z (intensity). The methodology presented in [Cru14] and previously used to calibrate spectral data recorded in T6 [CDM19a, GCM21] was followed to the extent possible with the current state of development of the system, and Table 2 summarises whether the calibration curves were obtained experimentally or through simulations.
| Calibration function | Method | Figure | Dimension |
|---|---|---|---|
| ILS | Experiment | 16 | Wavelength |
| SRF | Simulation | 17 / 21 | Space |
| LSF | Simulation | 20 / 21 | Space |
| Shock motion | Simulation | 21 | Space |
| Rad. per count | Experiment | 23 | Intensity |
Table 2. Smearing functions summary. Details and explanations can be found in subsequent subsections.
4.1. Wavelength calibration
4.1.1. Wavelength to pixel fit
Measurement of known atomic lines from a mercury lamp in the 253-580 nm range was used to linearly fit the peaks to their expected wavelengths, as shown in Fig.14. For each spectral image taken, all identifiable spectral lines were used to perform independent linear fittings (Fig.15) and cross-compare the pixel location to wavelength correspondance obtained. The fitted wavelengths axis is then used to find the instrument line shape function (ILS).

Figure 14. Pixel to Wavelength Calibration - Sample set from mercury lamp
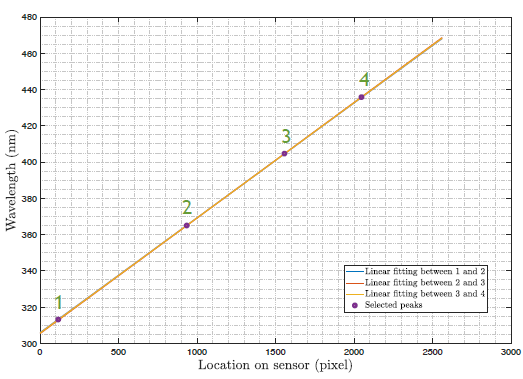
Figure 15. Pixel to Wavelength Calibration - Linear Fit. Numbers corresponds to the peaks shown in Fig.14.
4.1.2. Spectral Instrument Line Shape (ILS)
An accurate characterisation of the ILS is essential to be able to both model and quantify physical effects affecting the spectral line shape, such as pressure broadening or Stark effect, dominant at the speeds of interest [Cru12]. Using the most intense spectral lines on each calibration image recorded, the square root of a Voigt function is fit to the signal. It was empirically found that these were the best fit for VUV cameras, and that neither Gaussian nor Lorentzian functions alone could accurately capture the ILS with intensified CCD arrays [Cru14]. Lines of lower intensities are then passed through the same function to validate the quality of the fitting. Knowledge of this function will also be used following experiments to obtain an estimation of electron densities [Cru12].

Figure 16. ILS fitting using the square root of a Voigt function
As seen in Fig.16, the ILS obtained is asymmetric, which could be due to slight misalignment of the optics inside the spectrometer, or of the light source in front of the slit itself. The full-width half-maximum Gaussian and Lorentz coefficients from a square root of Voigt function fitting were found to be 1.3221 and 0.0476 nm respectively. EAST experiments performed using the same slit width of 100 $\mu$m and same grating of 150 gr.mm$^{-1}$ had ILS with similar Gaussian and Lorentz coefficients of 1.3299 and 0.0294 nm [AAts].
4.2. Spatial calibration
4.2.1. Resolution of optics

Figure 17. Approximated optical resolution function, using the signal received by the collimating mirror from a point source at the centerline of the tunnel.
Using the ray-tracing simulation results, the signal received at the position of the collimating mirror was obtained to measure the angle between the edge rays emanating from a point source on the tunnel’s axis. The optical resolution function in Fig.17 was approximated by a triangle of the same angle, as the light from the point source captured by the camera is described by the volume of the cone contained within the edge rays [Cru14]. This approximation confirms the effectiveness of the telecentric system to keep this volume and therefore the associated spatial smearing small. As shown in Fig.17, the angle of the cone is 43% smaller than the one from the EAST collection optic system presented in [Cru14] which recorded VUV spectra with satisfying spatial resolution, which suggests less spatial merging of emission characteristics.
4.2.2. Resolution of collection optics and CCD array
By simulating 2E6 light rays emanating from the tunnel’s axis, clustered to form a square light source of known dimension and location, a sharp edge was simulated (Fig.18) and used to obtain an approximation of the resolution function and estimate the spatial smearing of the optics.

Figure 18. Light received by the virtual sensor from the sharp edge simulation. Location of the middle pixel of the sensor is shown.
The camera sensor was modelled by positioning a virtual screen of equal dimension and resolution at the spectrometer slit location. The outer edge of the emitting square was positioned in the middle of the field of view, ideally creating a step in intensity right in the middle of the camera’s sensor. The intensity of each column of pixels, representing spatial location along the window, was binned to obtain the edge spread function (ESF) shown in Fig.19. The line spread function (LSF), corresponding to its derivative, is shown in Fig.20. If the optical system provided perfect imaging, this function would correspond to a Dirac impulse function located at the sensor’s centerline.

Figure 19. Approximated Spatial Edge Spread Function.
The LSF curve was found to be slightly shifted from the center of the camera’s sensor. It can be seen on Fig.18 that the image is shifted to the left by a few pixels, and suffers from some astigmatism deforming its shape from a perfect square. It can also be observed that the intensity tends to be higher towards the right, which could also be observed to a lesser degree in the simulation in Fig.11. This could be due to the lack of symmetry of the optical system creating a higher ray concentration to one side, which generates an asymmetric and slightly shifted spatial smearing function.

Figure 20. Approximated Spatial Line Spread Function.
Some additional smearing may also be introduced by the optics contained in the spectrometer, which also comprises a cylindrical mirror to correct for the astigmatism measured by the manufacturer.
4.2.3. Shock motion
The loss of resolution due to the shock motion during the camera shuttering was approximated by defining the smearing length as the product of the shock velocity and the camera’s gating time. The corresponding spatial resolution function was modelled as a square wave of equivalent width. An example can be seen in Fig.21.
4.2.4. Total spatial smearing function
The functions presented in section 4.2 were convolved, and the resulting spatial smearing function applied to the radiance simulations as shown graphically in Fig.21.

Figure 21. Spatial smearing function applied to all radiation simulations
4.3. Intensity calibration
Finally, an intensity calibration was performed using a deuterium lamp (Hamamatsu L7292). The light source and camera were mounted on the spectrometer, and the system pumped down to 1.35E-5 mbar before recording spectra and fitting it to the manufacturer’s spectral radiance curve.
4.3.1. Wavelength fit
A linear wavelength fit was found to be insufficient to satisfyingly fit the signal, and was therefore refined by performing linear interpolations on smaller sets of pixels. Once the signal was fitted in wavelengths, corrections could be applied.
4.3.2. Raw signal corrections

Figure 22. Comparison of raw and corrected signals
A picture of the background noise for the same spectrometer and camera parameters was recorded at the same level of vacuum, and subtracted from the calibration signal. As the deuterium lamp underfills the spectrometer slit which has the same F# as the rest of the optics, the calibration signal was multiplied by the ratio of the spectrometer and lamp solid angles spectrometer lamp to compensate for the extra signal which will be collected during a shot. Finally, the signal was multiplied by the reflectivity curve of the Al+MgF2 mirror coating for each mirror used in order to simulate the optical loss through the focusing optics which are not present in the current state of the set-up. The effects of these corrections can be seen in Fig.22.
4.3.3. Intensity fit

Figure 23. Radiance per count calibration for each wavelength
The corrected signal was finally fitted using the expected radiance curve from the deuterium lamp. The obtained values of counts per spectral radiance as a function of wavelength shown in Fig.23 can be used to convert the spectra to units of radiance.
5. TEST CONDITION SELECTION
The smearing functions parameters obtained in Section 4 were applied to the simulations presented in this section to create a more representative model of a non-ideal physical optical collection system.
Shock-tube post-shock relaxation simulations were performed using Poshax3 [JG22], and the results of temperatures, pressures, and species number densities along lines of sight perpendicular to the window’s test section used as an input for radiation simulations using NASA’s code NEQAIR. These simulations aim at reproducing conditions from either experiments performed by NASA in their Electric Arc Shock Tube (EAST) facility which showed experimentally measurable levels of radiative emission in the VUV, data points from previous test campaigns performed in the Oxford T6 wind tunnel, or re-entry points from the Fire II mission.
Three conditions with flow parameters shown in Table 3 were selected for showing good trade-off between the high level of radiance shown by simulation in the wavelength range of 120-200 nm, and the spatially large region of non-equilibrium. It is therefore believed that these points will generate measurable data during experiments, as the level of radiance intensity and the non-equilibrium region are large enough to be respectively spectrally and spatially resolved by the camera and the optical collection system. These data points are shown in the context of the facility’s history and literature in Fig.24.
![Figure 24] (https://indico.esa.int/event/394/contributions/6997/attachments/4720/14599/figure_24_page_10.png)
Figure 24. Tests of interests in facility and context in literature. The T6 shots data is presented in [CDS+21, HCG+]. EAST shots data can be found in [AAts].
Table 3: Flow conditions simulated in view of the next test campaign. Freestream mass fractions are assumed to be 0.767 for $N_2$ and 0.233 for $O_2$.
| Shot P1 | (Pa) | $u_\infty$ (km/s) | $T_\infty$ (K) |
|---|---|---|---|
| EAST 57-8 | 26.66 | 10.66 | 293 |
| Fire II | 2.08 | 11.36 | 195 |
| Non-eq | 6.66 | 11.38 | 293 |
5.1 Poshax3 and Neqair Simulations
5.1.1. EAST shot
Experiments performed in EAST were simulated and compared to shots previously performed in T6. Shots highlighted by NASA for showing measurable spectral radiance levels in the VUV range of the spectrum were selected.

Figure 25. Post-shock three-temperature variation from simulation of the EAST shot 57-8 [AAts]
As seen on the temperature trace in Fig.25, shot 8 from the EAST test campaign 57 was found to give a non-equilibrium region of about 5mm length behind the shock. Although short, this can be sufficiently resolved by our optical system which has a spatial resolution of 0.047mm per pixel.

Figure 26. Radiance obtained from simulation of the EAST shot 57-8 [AAts]
The spectral radiance shown in Figs.26 and 27 in the 120-200 nm range reaches a maximum of 1200W.cm$^{-2}$.Sr$^{-1}$.$\mu^{-1}$m over this region, giving measurable radiance in the EAST facility which uses an optical system of similar resolution [GCGY09, Cru14]. The next test campaign will therefore aim at recreating this condition. Corresponding flow characteristics are shown in Table 3.

Figure 27. Spectral and cumulated radiance from simulation of the EAST shot 57-8 [AAts]
5.1.2. Fire II re-entry point
A simulation of a trajectory point from the Fire II mission, corresponding to t = 1634 s shown spectral radiance levels lower than the first point selected in Section 5.1.1, with a maximum of 430W.cm$^{-2}$2.Sr$^{-1}$.$\mu$m$^{-1}$1 at 120 nm as shown in Figs.28 and 29.

Figure 28. Radiance obtained from simulation of the Fire II mission re-entry point
This data point was however judged particularly interesting because of the large non-equilibrium region it presents. Figure 25 shows a length of 24.24mm behind the shock before temperatures start to plateau, which corresponds to a quarter of our available field of view. In this case, temperatures seem to keep on rising slightly long after the shock has passed, instead of completely plateauing to a steady value. Corresponding flow conditions can be found in Table 3.

Figure 29. Spectral and cumulated radiance from simulation of the Fire II mission re-entry point

Figure 30. Post-shock three-temperature variation from simulation of the Fire II mission re-entry point
5.1.3. Non-equilibrium point
Finally, a data point from a previous test campaign performed in T6 was simulated. As shown in Figs.33 and 31,
temperature and radiance plateau shortly after the shock,
after just less than 10 mm. However, the spectral radiance profile shown in Fig.33 presents a few high peaks at
120, 131, 149.4 and 174.4 nm with spectral radiances as Figure 33. Spectral and cumulated radiance from simuhigh as 1000, 1026, 1056 and 1125 W.cm$^{-2}$.Sr$^{-1}$.$\mu^{-1}$m
respectively. This point was therefore selected as the radiance from this shot should be easily measurable. Corresponding flow conditions can be found in Table 3.

Figure 31. Post-shock three-temperature variation from
simulation a previous T6 shot

Figure 32. Radiance obtained from simulation a previous T6 shot

Figure 33. Spectral and cumulated radiance from simulation a previous T6 shot
6. Conclusion
A VUV spectroscopy system is currently in the final design stage to be mounted on the Oxford T6 Stalker steel shock tube to perform emission spectroscopy. The collection optics were designed as a telecentric system using an optimisation code and widely characterised through ray-tracing simulations. The system in its current state was calibrated in all three dimensions of wavelength, space and radiance. A few experimental points of interest for investigation of the non-equilibrium region have been highlighted. These conditions of interest were simulated using Poshax3 and NEQAIR to obtain predictive levels of radiance in the VUV. Before the test campaign to come, further study of absorbance and individual spectral lines in these regions will be conducted through simulations, as well as further characterisation of the system using the optics to compare with simulations. Some phenomena observed in previous test campaign in T6, such as slight hydrogen contamination and underestimation of electron density will also be added to the simulation model.
7. Acknowledgement
This research was funded by the UKRI Future Leaders Fellowship scheme (grant number MR/T041269/1), and we extend our gratitude to UKRI. For Open Access, the author has applied a CC BY public copyright licence to any Author Accepted Manuscript (AAM) version arising from this submission.
References
[AAts] B. Cruden National Aeronautics and Space Administration. Electric arc shock tube (east) test data. https://data.nasa.gov/docs/datasets/.
[BJ14] A. M. Brandis and C. O Johnston. Characterization of stagnation-point heat flux for earth entry. 45th AIAA Plasmadynamics and Lasers Conference, 2014.
[BJC16] A. M. Brandis, C. O Johnston, and B.A Cruden. Investigation of nonequilibrium radiation for mars entry. 46th AIAA Thermophysics Conference, 2016.
[CDM19a] P. Collen, L. Doherty, and M. McGilvray. Measurements of radiating hypervelocity air shock layers in the t6 free-piston driven shock tube. International Conference on Flight Vehicles, Aerothermodynamics and Re-Entry Missions and Engineering, 2019.
[CDM+19b] P. Collen, L. Doherty, M. McGilvray, I. Naved, R. T. Penty Geraets, T. A. Hermann, R. G Morgan, and D. Gildfind. Commissioning of the t6 stalker tunnel. AIAA Scitech 2019 Forum, 2019.
[CDS+21] Peter Collen, Luke J. Doherty, Suria D. Subiah, Tamara Sopek, Ingo Jahn, David Gildfind, Rowland Penty Geraets, Rowan Gollan, Christopher Hambidge, Richard Morgan, and Matthew McGilvray. Development and commissioning of the t6 stalker tunnel. Experiments in Fluids, 2021.
[Cru12] B. A. Cruden. Electron density measurement in reentry shocks for lunar return. Journal of Thermophysics and Heat Transfer, 26, 2012.
[Cru14] B. A. Cruden. Absolute radiation measurements in earth and mars entry conditions. 2014. [GCGY09] R. B. Greenberg, B. A. Cruden, J. H. Grinstead, and D. Yeung. Collection optics for imaging spectroscopy of an electric arc shock tube. Novel Optical Systems Design and Optimization XII, 74290H, 2009.
[GCJ+] Alex B. Glenn, Peter L. Collen, Carolyn M. Jacobs, Christophe O. Laux, and Matthew McGilvray. 9th International Workshop on Radiation of High Temperature Gas.
[GCM21] A. B. Glenn, P. L. Collen, and M. McGilvray. Experimental nonequilibrium radiation measurements for low-earth orbit return. AIAA SCITECH 2022 Forum, 2021.
[HCG+] Tobias Hermann, Peter Collen, Alex Glenn, Tamara Sopek, Matthew McGlivray, , and Luca di Mare. 9th International Workshop on Radiation of High Temperature Gas.
[HLZ+16] T. Hermann, S. Lohle, F. Zander, H. Fulge, and S. Fasoulas. Characterization of a reentry plasma wind-tunnel flow with vacuumultraviolet to near-infrared spectroscopy. Journal of Thermophysics and Heat Transfer, 2016.
[JG22] P. A. Jacobs and R. J. Gollan. Eilmer 4.0 flow simulation program. 2022.
[JMG+13] C. O. Johnston, A. Mazaheri, P. Gnoffo, B. Kleb, and D. Bose. Radiative heating uncertainty for hyperbolic earth entry, part 1: Flight simulation modeling and uncertainty. Journal of Spacecraft and Rockets, 50, 2013. [Jr.19] J. D. Anderson Jr. Hypersonic and hightemperature gas dynamics, third edition. 2019.
[MDM+15] M. McGilvray, L.J. Doherty, R. G Morgan, D. Gildfind, P. Jacobs, and P. Ireland. T6: The oxford university stalker tunnel. 20th AIAA International Space Planes and Hypersonic Systems and Technologies Conference, 2015.
[SCG+] Joseph Steer, Peter Collen, Alex Glenn, Tamara Sopek, Luke Doherty Christopher Hambidge and, Matthew McGilvray, Stefan Loehle, , and Louis Walpot. 9th InternationalWorkshop on Radiation of High Temperature Gas. [Yur02] Yury. Optometrika. (https://github.com/caiuspetronius/Optometrika), GitHub., 2002
Summary
The T6 Stalker Tunnel shock tube was previously used to perform emission spectroscopy in the wavelength regime of 350-850 nm to measure radiation in the shock layer. A VUV emission spectroscopic system is currently under development to use on T6 in its steel shock tube mode, with the goal to perform spectroscopy for shots in the speed range 10-15 km.s−1 and for various gas densities. This system was designed to offer fast turn-around, easy calibration and ensure repeatability between experiments. It comprises a telecentric optical system developed using an optimisation approach, and ray tracing simulations were run to observe, quantify and correct optical aberrations.